
Chengran (Felix) Guan
2026-08-08 · 8 min read
How to Brief a Photographer:
An Agent's Pre-Shoot Checklist
The fastest way to get better listing photos and video is not a better camera — it is a better brief. A clear pre-shoot brief tells your photographer exactly which rooms matter, which angles your market expects, and which MLS rules apply, so you stop paying for reshoots and start selling listings faster. This checklist covers everything to send before the shoot, the shot list to include, and the photo-versus-video decisions to make for each listing.
Key Takeaways
- Brief 48 hours out: Send property details, access instructions, and MLS rules before the photographer arrives — not the morning of.
- Include a room-by-room shot list: Missing angles are the number one reason listings need a second shoot.
- Decide photo vs video per listing: Not every home needs a walkthrough. Decide before you brief, not after.
- Brief for what AI cannot fix: AI editing handles color, light, and clutter, but it cannot invent the primary suite shot you forgot to request.
Why the Brief Matters More Than the Gear
Buyers judge a home before they ever step inside. In the National Association of Realtors' Profile of Home Buyers and Sellers, photos rank as one of the most important features of a listing, and the overwhelming majority of buyers start their search online — NAR's research library tracks how buyers use listing media at every step. Industry research compiled by RisMedia points the same direction: listings with professional photography consistently sell faster and earn more attention than listings shot on a phone.
Here is what most agents miss: the photographer shows up ready to shoot whatever is in front of them. If the brief does not say which rooms carry the sale — the kitchen, the view, the primary suite — you get a generic set of photos that looks like every other listing. A good brief is cheap. A reshoot costs a second day, a second round of scheduling, and a listing that sits on the market while you wait.
Before you book anyone, read our guide to hiring and managing a real estate photographer — then use the checklist below to brief them properly.
What to Send Before the Photographer Arrives
A pre-shoot brief is a single document with five parts. Send it at least 48 hours before the shoot so the photographer can plan routes, light, and equipment.
- Property access: Address, lockbox code, alarm code, gate code, parking instructions, and whether pets are present. Nothing burns a shoot faster than a photographer locked out with a $1M home behind the door.
- Schedule and light: Preferred time of day, and whether the seller is home. Exteriors need soft morning or late-afternoon light; interiors are fine mid-day if windows are clean.
- The shot list: Your must-have angles, room by room (next section).
- MLS and platform rules: Photo count limits, file format requirements, watermark rules, and any virtual staging disclosure your local board requires.
- Deliverables and deadlines: How many photos, whether video is included, when the listing goes live, and the required turnaround.
Put it in writing. A verbal "shoot the place" brief produces exactly what it sounds like. Sellers appreciate seeing the plan too — it tells them you are running a professional listing, which is a quiet argument for your next listing appointment.
The Shot List: Must-Have Angles Room by Room
Give your photographer the angles you know sell, not just "everything." A complete real estate shoot usually runs 25-40 photos for a standard home. Here is the baseline list to paste into your brief:
- Exterior: Front elevation (straight-on), curb appeal from the street, driveway, entry door, and any outdoor living space. Add twilight or drone shots if the listing justifies them.
- Kitchen: The money room. Full-room shot, island/detail shot, and counter-to-ceiling angles that show cabinet space.
- Living areas: Wide-angle from at least two corners, plus a fireplace or feature wall detail.
- Bedrooms: Straight-on from the doorway, showing the full room with the bed made and windows lit.
- Bathrooms: Full-room shot and vanity/detail shot. Clean counters and fresh towels are part of the shoot prep.
- Unique features: View, vaulted ceilings, wine cellar, home office, backyard pool — whatever differentiates the home.
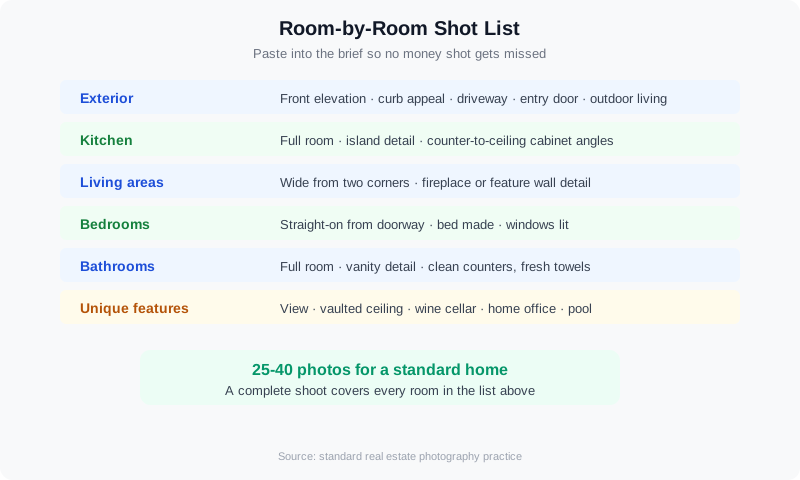
A room-by-room shot list keeps the shoot on plan and prevents missing-money-shot reshoots.
For a deeper look at what makes a listing photo sell — composition, angles, and the shots buyers linger on — see our step-by-step guide to shooting listing photos that sell.
Photo vs Video: Brief Each Listing on Its Own Terms
Not every home needs a cinematic walkthrough, and every listing needs photos. The brief is where you draw that line. Use our photo vs video priority framework to decide per listing, then tell the photographer exactly what to capture.
A few practical rules of thumb for the brief:
- Video earns its place on premium listings: Luxury homes, properties with views or unique layouts, and listings in competitive price bands justify a walkthrough video.
- Ask for both formats at once: A photographer already on-site can capture b-roll in 15 extra minutes. Ordering video later means a second trip at full price.
- Specify orientation: Horizontal for MLS and most portals, vertical 9:16 clips for Instagram Reels and TikTok. One shoot can deliver both if the brief says so.
- Confirm what AI will handle: If you plan to enhance or stage photos in editing, say so — the photographer can focus on clean, wide coverage instead of over-shooting the same room for safety.
MLS Rules and Platform Specs Go in the Brief
Your local MLS has rules about photo counts, file types, watermarks, and — increasingly — virtual staging disclosure. Your photographer should not have to guess them. Our complete guide to MLS video requirements covers the format side; the brief covers the board-specific side.
At minimum, include: maximum photo count, accepted file format and resolution, whether the listing syndicates to portals (Zillow, Realtor.com, Redfin) with different spec limits, and any disclosure language required for virtually staged or AI-enhanced images. Agents who skip this end up with rejected uploads and a listing that goes live a day late — exactly the delay that costs showings.
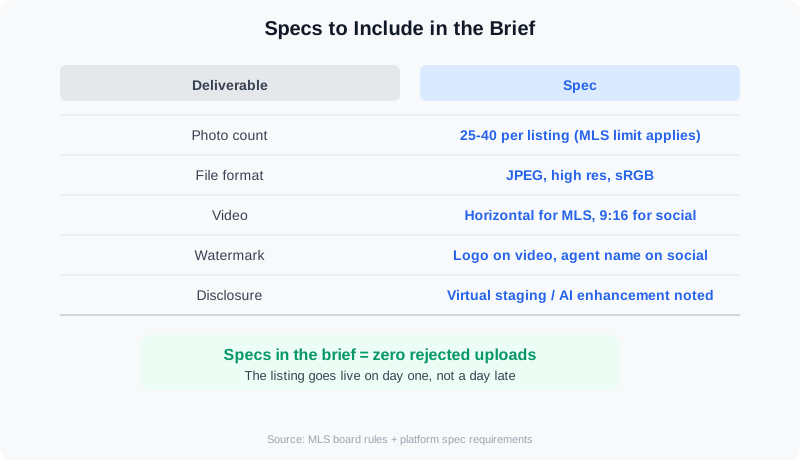
Include format specs in the brief so the delivery matches MLS and portal requirements on day one.
Watch how a professional shoot is prepared on-site — the same preparation your brief should enable.
The Pre-Shoot Checklist, Ready to Copy
Paste this into your next booking email. It takes five minutes to fill out and saves a full reshoot cycle.
- Property address and access details (lockbox, alarm, gate, parking, pets).
- Shoot date, arrival window, and whether the seller will be home.
- Seller prep confirmed: clutter cleared, beds made, counters clean, windows washed.
- Shot list attached, with the three money shots named (usually kitchen, exterior, primary suite).
- Deliverables: photo count, video walkthrough yes/no, drone yes/no, twilight yes/no.
- Orientation and formats: horizontal for MLS, vertical clips for social.
- MLS board rules: photo limits, file specs, watermark policy, staging disclosure.
- Branding needs: logo overlay on video, agent watermark on social versions.
- Deadline: listing go-live date and required turnaround.
- Point of contact: who answers questions during the shoot, with a phone number.
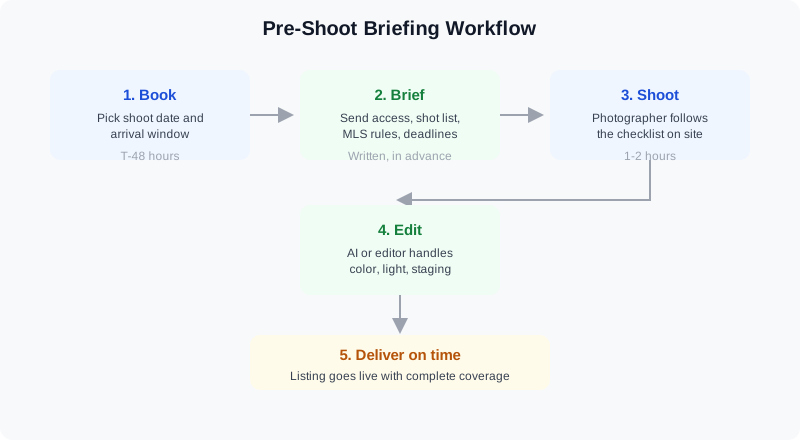
Brief → shoot → edit → deliver: a repeatable workflow keeps every listing on schedule.
How AI Changes What You Brief
AI editing has quietly changed the photographer brief. Color, exposure, and even clutter can be fixed after the shoot — AI photo editing for real estate handles lighting correction, decluttering, and virtual staging in minutes. That means the brief should spend less energy on conditions AI fixes and more on coverage AI cannot invent.
What AI cannot do: capture the room that was not shot, the view that was not framed, or the exterior the photographer never walked. So brief for complete coverage, then let editing do the polish. With VideoGuru, you get both sides of that workflow — one-click virtual staging, declutter, and furniture swaps for photos, plus an AI video editing suite that turns the same shoot into walkthroughs, social clips, and branded listing videos. The same AI that enhances your photos also builds your video content, which is exactly why the brief should specify both deliverables up front.
If you want to see how far a single shoot can go, our guide to creating listing videos in under 10 minutes shows the photo-to-video workflow in action.
Frequently Asked Questions
What should an agent send a photographer before a shoot?
Send a one-page brief at least 48 hours ahead: property access details, shoot time and seller availability, a room-by-room shot list, MLS and platform format rules, deliverables (photo count, video, drone), and the listing deadline. A written brief prevents reshoots and sets expectations on both sides.
How long does a real estate photo shoot take?
A standard 2,000-3,000 square foot home takes roughly 1-2 hours for photos, with video walkthroughs adding 30-45 minutes. Add time for drone work or twilight shots. If the seller has not prepped the home, expect the shoot to run longer — that is why seller prep is a checklist item, not a surprise.
Should I brief video separately from photos?
Put both in one brief. A photographer on-site can capture video b-roll and vertical social clips in one pass, which is far cheaper than a second trip. Specify orientation (horizontal for MLS, vertical for Reels and TikTok) and whether you want a full walkthrough or short highlight clips.
What if my listing photos come back too dark or dull?
First, check the brief: dark photos usually trace back to a mid-day exterior or a room with no window light scheduled at the wrong time. Second, know that exposure, color, and sky replacement are exactly what AI photo editing fixes in seconds. If the problem is coverage — a missing room or angle — that requires a reshoot, which the checklist prevents.
Ready to turn every shoot into a complete media package without hiring an editor? VideoGuru's AI photo editing and video tools can virtually stage, declutter, and enhance your listing photos, then turn the same shoot into branded walkthrough videos in minutes — all in one platform. Start for free at VideoGuru.
Putting It All Together
A five-minute brief is the cheapest insurance in real estate marketing. It gets you complete coverage, correct formats, and on-time delivery — and it tells the photographer you know what a professional listing looks like. Send the checklist 48 hours before every shoot, decide photo versus video per listing, and let AI handle the polish after the photographer leaves. Your listings will go live faster, look sharper, and sell on their first impression.