
Chengran (Felix) Guan
2026-09-14 · 13 min read
Real Estate Walk-Through Videos:
How to Shoot, Edit, and Post Them
To improve the quality of your real estate walk-through videos, fix three things before you touch a camera or an editor: motion, light, and length. Shoot at 24 or 30 frames per second with stabilization on, walk at half your normal speed, hold each room for 3 to 4 seconds, and cut the final video to 60 to 90 seconds. Agents filming their own listings can do this with a phone in a single visit. Photographers and videographers should lock the same shot list on every property so delivery is predictable. And if the home is already photographed, a walk-through built from the listing photos takes about 10 minutes and needs no second trip. The rest of this guide is the shot list, the edit, and the posting plan for each of those three routes.
A walk-through is the single most requested video format in residential real estate because it answers the question photos cannot: how does this house flow? This guide covers what the format is, how to shoot it, how to edit it, how to post it, and how to produce one when nobody is available to film.
Key Takeaways
- Walk-through equals flow. A real estate walk-through video moves the viewer front door to back yard in one continuous path; a montage of disconnected clips is a teaser, not a walk-through.
- Shoot settings that matter: 24 to 30fps, stabilization on, wide lens, half-speed walk, 3 to 4 seconds held per room.
- Length wins attention: 60 to 90 seconds for listings under 2,000 sq ft, 2 to 3 minutes for luxury and acreage.
- No second trip required: AI photo-to-video turns existing listing photos plus any drone or real-person clips you have into a narrated walkthrough in roughly 10 minutes.
- Post once, publish four ways: MLS or listing site, YouTube (with a title that reads like a search query), Instagram and Facebook Reels, and your website.
What a Real Estate Walk-Through Video Actually Is
A real estate walk-through video is a continuous, single-path tour of a property that follows a buyer's natural route: approach, entry, main living spaces, kitchen, bedrooms, outdoor space. The camera moves through the home the way a person would walk it, which is why the format earns its name. It is not a montage, not a slideshow, and not a highlight reel.
That distinction matters because it changes how you shoot. A montage needs beautiful individual clips. A walk-through needs continuity between clips, so the edit feels like one trip instead of twelve unrelated rooms.
- One direction, one path: decide the route before you press record, and never double back through the same doorway on camera.
- Held motion: slow push-ins and gentle pans beat fast reveals. Buyers want to read the room, not watch a camera fly.
- Real light only: open blinds, turn on every lamp, and shoot daylight hours. Mixed light flatters neither the home nor your camera.
- Optional narration: a spoken walk-through or a text-to-voice track tells a story. Music alone is fine for shorter cuts.
The behaviour behind this format is well documented. NAR's Home Buyers and Sellers Generational Trends research has tracked for years how heavily buyers rely on listing media before they ever request a showing, and the practical upshot has not changed: the listing that lets a buyer understand the layout online is the one that gets the appointment.
Walk-Through Video vs. Virtual Tour vs. Teaser: Which Do You Need?
These four listing video formats get used interchangeably in conversation and then confuse clients at the proposal stage. They are not competing options; they do different jobs. Match the format to the question the buyer is asking.
| Format | What it shows | Best for | Typical time to produce | Where it lives |
|---|---|---|---|---|
| Walk-through video | Continuous tour along one path | Every listing; the default choice | 1 to 2 hours on site, or about 10 minutes from photos | MLS or listing site, YouTube, website |
| Virtual tour (360 / 3D) | Buyer-controlled navigation, room to room | Luxury, unique layouts, out-of-market buyers | Half a day on site plus processing | Listing site, dedicated tour host |
| Listing teaser (30 sec) | Best 6 to 8 shots, fast cuts | Social feeds, paid ads | 20 to 40 minutes | Reels, Shorts, TikTok |
| Photo slideshow | Stills with motion (pan, zoom) | New listings before a shoot, FSBO | 5 to 15 minutes | Social feeds, email |
A practical rule: shoot the walk-through first, then cut a 30-second teaser out of it. One visit, two assets. If you already have a full walk-through, the teaser is a trim, not a second production.
How to Shoot a Walk-Through Video in One Visit
The shoot is decided before you arrive. Plan the route in listing-photo order, park out of frame, and remove the small things that ruin continuity: cars in the driveway, trash bins, pet bowls, charger cables, and any item you would have to move mid-shot.
What Are Some Tips for Filming Effective Real Estate Walkthroughs?
- Walk at half speed and breathe. Camera shake comes from your steps, and your steps slow down when you deliberately walk slower than feels natural. Keep elbows in, phone or gimbal at chest height.
- Hold each room for 3 to 4 seconds minimum. Buyers need that long to register the layout. Faster feels rushed and forces rewatches.
- Lock exposure and focus first. Tap and hold on the brightest window, drag exposure down, then lock. Auto-exposure hunting is the number one giveaway of an amateur walk-through.
- Shoot the transitions, not just the rooms. Doorways are the connective tissue of a walk-through. Record yourself stepping through them so the edit has seams to cut on.
- Film 16:9 for the listing and vertical for social in the same visit. Do the horizontal pass first, then re-walk the best three rooms vertically. Retrofitting a horizontal clip to vertical ruins the framing.
- Kill dead air on site. Pause 2 seconds at the start and end of every clip. Editors need handles; amateurs hand over clips that start mid-motion.
For a shot-by-shot breakdown that pairs with this route, the Listing Video Shot List covers the eight shots that carry most listing videos. This guide adds camera movement and pacing on top of it. If you are shooting an event rather than a listing, the open house video workflow swaps the empty-home route for a crowd-and-conversation route.
Shot list in hand, the visit itself is short. A 1,800 sq ft home takes 35 to 50 minutes to film a clean walk-through with handles, transitions, and one vertical pass.
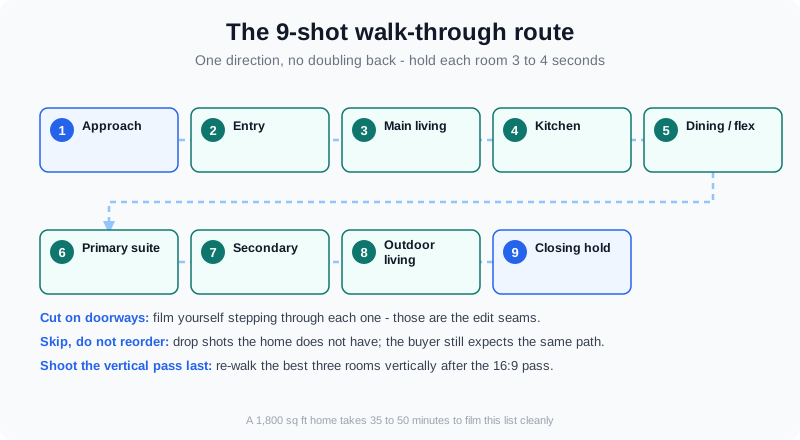
The walk-through route: one direction, no doubling back, transitions filmed at the doorways.
Filming a property tour without walking into your own shot - the quiet camera technique that keeps a walk-through clean enough to cut together.
The 9-Shot Walk-Through Sequence
This is the sequence I use on every property. It follows the buyer's eye and gives the editor natural cut points. Skip a shot if the home does not have the feature, but do not reorder it.
- 1. Approach (5 sec): from the sidewalk or driveway, moving toward the front door. Sets the neighborhood and the facade.
- 2. Entry (4 sec): stepping through the front door into the foyer. This is the transition that makes the tour feel real.
- 3. Main living space (6 to 8 sec): slow push-in from the doorway, holding wide enough to show the room's proportions.
- 4. Kitchen (6 to 8 sec): enter from the living space, pan across the counters, and end on the window or the island.
- 5. Dining or flex space (5 sec): brief hold. Do not linger on empty rooms.
- 6. Primary suite (6 sec): doorway push-in, then a slow pan that catches the closet or the en-suite door.
- 7. Secondary rooms (3 to 4 sec each): one pass per room, in hallway order. No pans needed.
- 8. Outdoor living (6 sec): step out through the back door. Show the deck, yard, or view from the property itself.
- 9. Closing hold (4 sec): a wide frame of the home's best angle, inside or out. This is where the agent card or logo lands.
How to Edit a Walk-Through Video (Three Routes)
Editing is where walk-throughs are won or lost. The goal is simple: make 20 clips feel like one continuous walk, and keep the whole thing under 90 seconds unless the property earns the extra time.
| Route | Who it fits | Time to finish | What you need |
|---|---|---|---|
| DIY edit | Agents who filmed on a phone | 45 to 90 minutes | A phone or desktop editor, one music track, a template |
| Hired editor | Photographers and busy agents | 1 to 3 business days | A briefing doc, raw footage upload, revision allowance |
| AI photo-to-video | Anyone with listing photos already shot | About 10 minutes | The listing photo set, plus any drone or real-person clips you want mixed in |
Whichever route you take, three edit moves separate a professional walk-through from a raw dump. Cut on doorways so each transition is motivated. Trim every clip to the moment it stops being interesting. Put a text overlay with the address or the listing's key number in the first 3 seconds, because that is what earns the scroll-stop.
For the full editing pass - color, music, captions, and export settings - the AI listing video walkthrough covers the 10-minute turnaround version end to end. If you outsource, the same principles are what your editor needs in the brief, and the photographer case study on cutting editing time shows how that stack looks in a real media business.
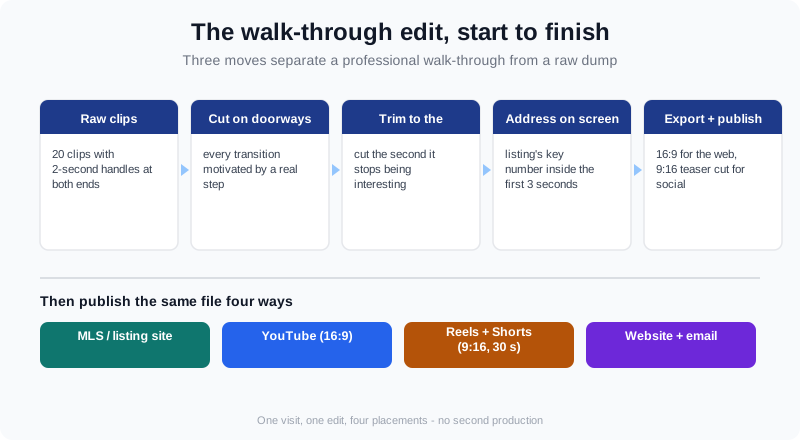
The edit flow: cut on doorways, trim to the interesting moment, land the address in the first 3 seconds.
How Can You Improve the Quality of Your Real Estate Walk-Through Videos?
Quality in this format is a checklist, not a talent. Run these six items on your next shoot and the difference is visible immediately.
- Stabilize the motion. A 3-axis gimbal or a phone's built-in stabilization removes 80% of the wobble. Handheld walking shots without either are the most common reason a walk-through looks amateur.
- Shoot at head height on every step. Camera height that drifts from chest to eye level disorients the viewer. Pick one height and keep it.
- Set white balance manually. Auto white balance shifts between rooms and makes the paint colors look different in every shot.
- Record 2 seconds of room tone per location. Ambient audio gives the editor something to fill gaps with if you cut narration.
- Shoot in the right light window. Early morning and late afternoon light reads as warm and dimensional. Flat midday light on a dark interior is the hardest to recover.
- Cut ruthlessly. A tight 60-second walk-through outperforms a loose 3-minute one on completion rate. Only stretch for luxury or acreage where scale is the story.
How to Post Walk-Through Videos So People Watch Them
A walk-through that stays on your phone sells nothing. Publish it in four places from the same file, and optimize each one differently.
- Your listing site or MLS: a walk-through almost always outconverts a stills-only listing because it answers the flow question before the showing.
- YouTube: title the video the way a buyer would search - '3 Bed 2 Bath Home Tour in [Neighborhood] | [Address]' - and write a two-sentence description with the address and the headline features.
- Instagram and Facebook Reels: post the 30-second teaser cut, not the full walk-through. Vertical, captions on, address in the first line of the caption.
- Your website and email: embed the full walk-through on the listing page and drop the YouTube link into your new-listing email.
Video SEO in One Paragraph
Google has indexed video on its own result surfaces for years; its own documentation on video indexing and video structured data spell out what Google needs to surface your file. In practice that means a descriptive title, a real thumbnail, a transcript or captions, and a page that surrounds the video with text about the same property. A walk-through quietly satisfies all four as long as you do not bury it on a page with no copy.
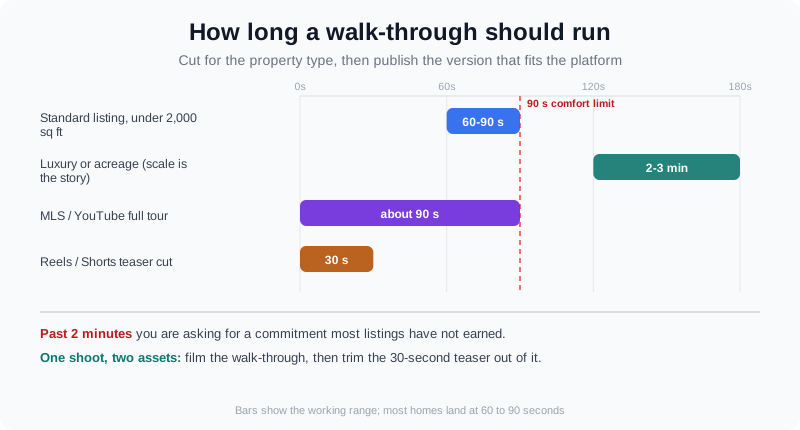
Length by property type, and which cut goes where.
Turning Listing Photos into a Walk-Through Video (No Second Trip)
Sometimes there is no shoot day: the photos are already delivered, the seller has moved out, or the agent is 400 miles away. In that case the walk-through gets built from the assets that exist rather than from a new visit.
An AI real estate media platform takes the listing photo set and assembles it into a moving walk-through in about 10 minutes: motion, sequencing, music, and a narration track included. The same route logic still applies - it moves through the property in order - so the output reads as a tour rather than a slideshow. If you have extra material from the original shoot, user clips such as drone shots or real-person footage can be mixed into the same walkthrough rather than sitting unused in a folder.
That same platform covers the stills side of the listing package. One-click virtual staging, declutter, furniture swap, and decor changes handle the rooms that were photographed empty, which matters when the photo set is doing double duty as both stills and video frames. The AI that powers the walkthrough also handles the listing photography, so the video and the photos ship from one place - the photo editing and virtual staging docs walk through it.
If you want a presenter in the walkthrough, an AI avatar generated from a headshot and a real-person voice clone can be composited into the property video itself - one integrated video, not a separate talking-head output. That capability sits on any paid plan, with no separate avatar subscription to bolt on. You can start that route from the login page.
What Walk-Through Videos Cost in Time and Money
Rather than quote a single price - markets vary too much for that to be honest - use a cost model and plug in your own market's rates. What is consistent across markets is the shape of the trade-off: you are buying time back at the cost of a per-listing fee.
| Route | Out-of-pocket per listing | Your time per listing | Best when |
|---|---|---|---|
| DIY phone shoot + edit | Effectively zero | 2 to 3 hours | You shoot your own listings and enjoy the process |
| Hired videographer, edited | Market rate, various | About 1 hour of coordination | Luxury and unique properties that justify production value |
| AI photo-to-video from existing photos | Plan-based, per listing | About 10 minutes | The listing is already photographed and the seller wants it live fast |
| Hybrid: shoot once, then cut teasers | One shoot fee | 30 to 45 minutes in the editor | You want a walk-through plus a month of social clips from one visit |
The hybrid route is the one most listing agents land on. One shoot day produces the full walk-through, a vertical teaser, and short clips for the listing's social campaign. For the broader mix - what to post, when, and how it maps to a listing's launch week - the real estate video marketing strategy guide and the real estate Reels playbook cover the calendar side.
Frequently Asked Questions
What are the best tools for creating real estate video walkthroughs?
There is no single best tool because the answer depends on whether you are filming. If you are filming, a stabilized phone or a mirrorless camera plus an editing app covers the job, and the deciding factor is your willingness to shoot and cut. If you are not filming, look for a platform that builds the walkthrough from listing photos, because that removes the shoot day entirely rather than automating part of it. Agents who want the walkthrough from listing photos in about 10 minutes sit in that second group; photographers who shoot for clients usually want both.
Which platforms are most popular for sharing real estate walkthrough videos?
In practice, four surfaces do the work: the listing site or MLS, YouTube, Instagram and Facebook Reels, and the agent's own website. MLS placements drive showing requests, YouTube captures search intent and hosts the embeddable file, Reels drives reach and brand recall, and the website is where an interested buyer converts. Publish the same walk-through to all four, with a vertical teaser cut for the social feeds.
How long should a real estate walk-through video be?
60 to 90 seconds is the working range for most homes under 2,000 sq ft. Homes between 2,000 and 3,500 sq ft hold 90 seconds to 2 minutes. Luxury properties and acreage can run 2 to 3 minutes because the scale of the property is itself the story. The cut should be as long as the property can hold attention, and not one second longer - completion rate matters more than total runtime.
Do you need a gimbal to shoot a walk-through video?
No, but you do need stabilized motion. Modern phone stabilization handles slow walking shots well if you walk at half speed and keep the camera at a consistent height. A gimbal becomes worth the cost when you are shooting multiple listings a month, adding pan and tilt moves, or shooting with a mirrorless camera that lacks in-body stabilization.
Can you make a walk-through video from listing photos?
Yes, and for a listing that is already photographed it is the fastest route. An AI platform sequences the photo set into a moving walk-through in order, adds music and narration, and finishes in about 10 minutes. It is the practical option when the seller has moved out, the agent is remote, or the photos were shot weeks before anyone thought about video.
Final Thoughts
A real estate walk-through video is not a technical achievement. It is a pace decision, a route decision, and a cutting decision, made in that order. Plan the path, walk it slowly, hold each room long enough to be read, and cut the result to 60 or 90 seconds.
Do that and the format does what nothing else in a listing does: it lets a buyer feel the flow of the house before they ever stand in it. The lists in this guide are the whole method - start with the nine-shot sequence on your next listing and refine from there.